Building a (Differential Drive) Robot
First you should experiment with a few parts to see how the fit together.
Exercise: Build a square or a rectangle with straight beams, right-angle beams, and the little black connectors.
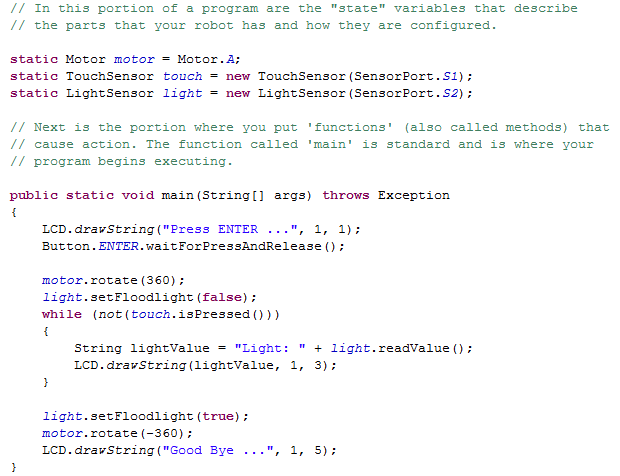
Next you should explore the actuators, or motors. The kit comes with three of them. Each motor needs to be connected to one of the brick's motor ports labeled A, B, and C. A motor can rotate forwards or backwards at different speeds and has a build-in rotation sensor that measures how many degrees a motor has rotated (with one-degree accuracy). You connect a motor to a port using one of the flat, black wires with the standard connectors on each side. As usual, everything should fit together easily. To engage a motor, i.e. to activate an actuator, you need to write an appropriate program, which we will do later. For now:
Exercise: Hook up a motor to one of the motor ports of the brick.
Let's move on to the sensors: touch, light, sound, ultrasound, and compass. A sensor connects to one of the sensor ports labeled 1 to 4 via the same cable you would use for the motors so that a robot can have up to four sensors (you could purchase additional parts that would allow you to extend the number of ports, but that's not in your kit).
Exercise: Hook up the touch sensor to port 1 and the light sensor to port 2 of the brick.
To activate the sensors and to monitor or react to their input (or output depending on your point of view) requires some programming, which we will do later in detail. For now:
Exercise: Your brick should now have a motor connected to port A, a touch sensor to port 1, and a light sensor to port 2. Given that construction, describe in your own words what you think the following program would make your "robot" do:
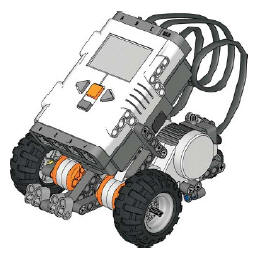
Now it is time to move on to a 'real' robot: we will be building a 3-wheeled car-like mobile robot called in technical terms a "differential drive" robot.
Differential Drive Robot
A differential drive robot is a robot with two motorized wheels that can be controlled independently and that allow your robot to:
- go straight by rotating both motors (wheels) at the same speed in the same direction
- go in a curve by rotating the wheels at different speeds in the same direction
- turn "on the spot" by rotating the wheels at the same speed but in opposing directions
An easy to understand but helpful representation (model) of a differential drive robot with wheel radius r and axes length R would look like this:
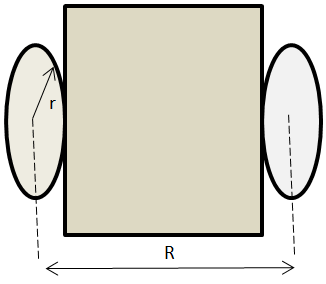
Model of a Differential Drive Robot
Such a differential drive robot can easily be equipped with different sensors and will be the basis for most of our experiments. I have included some detailed plans for two different differential drive model. The first is called "TriBot" and is simple and straight-forward. The alternative is a "TaskBot" and is a little more complicated to put together, but uses only two of our three motors, leaving one available for additional construction. It also seems to "drive" better. The TaskBot is the preferred robot to start out with. The construction plans are given as PDF files that are - hopefully - easy to follow:
NXT TriBot
TriBot construction planNXT TaskBot
TaskBot construction plan
(they require some modifications)